I am so sorry for the lack of posts recently. I've just been missing some blogging inspiration. 
I also can't quite figure out how I want my schedule to bed. What specific days I want to put up blog post. When I know what I'll decide You'll be the first to know ;)

> Ég vil byrja á að segja afsakið bloggleysið! Mér er búið að vanta smá inspiration en er búin að skrifa niður nokkrar hugmyndir þannig þetta ætti að vera komið í lag!
Er líka í algjörum vandræðum með að finna út hvernig skipulag ég vil hafa á blogginu, hvaða daga vikunar ég ætla að koma með færslur. Um leið og ég finn útur þessu þá læt ég ykkur vita ;)


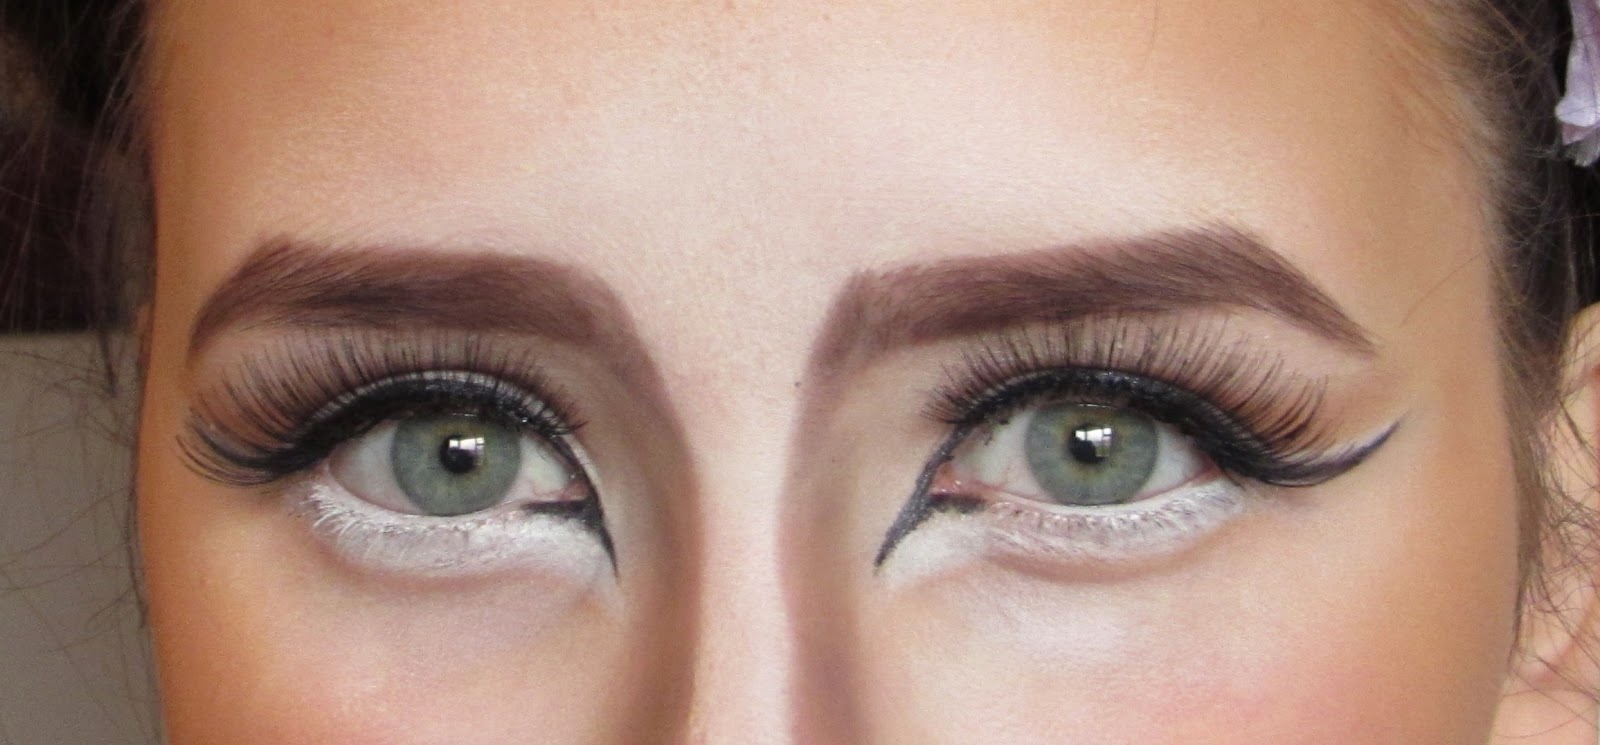
In this blogpost I wanted to show you how I did this reverse cat eye. 
It really is easy, but might take some patience.
I really like this look, you can always switch out the lipstick for another one and add some eyeshadows if you fancy.

> Í þessari færslu ætla ég að sýna ykkur hvernig ég gerði þetta öfuga kattar auga? Veit ekkert hvað ég get kallað þetta á íslensku. 
Þette er í rauninni mjög auðvelt, en gæti tekið smá þolinmæði.
Ég er mjög hrifin af lokaútkomuninni, þið getið auðvitað notað einhvern öðruvísi lit á varirnar og jafnvel bætt við augnskuggum ef ykkur langar.


I start of with my foundation and everything done. 
I wanted to share a quick tip with you guys. I've been doing this because my skin has been so dry lately. I take my L'oreal Lumi Magique primer and add one pump of it to my foundation. This gives my foundation a really nice, dewy finish and it doesn't sit on any of my dry spots.

> Ég byrja með að vera búin að farða mig alveg nema augun. 
Mig langaði að deila einu með ykkur sem hefur virkað vel fyrir þurra húðina mína. Ég tek L'oreal Lumi Magique primerinn minn og set eina pumpu af honum útí meikið mitt. 
Þannig fæ ég mjög fallegan ljóma í farðan minn og hann sest ekki á þurrkublettina mína.


I took my Maybelline eye kohl pencil. Any eye kohl pencil will do really. I placed this on my waterline and smudged it down. I took a really small brush to help me with the smudging. 

> Ég notaði Maybelline augnablýantinn minn en hvaða augnablýantur sem er virkar. Ég setti þetta á vatnslínuna og dreyfði úr honum niður, bætti við og dreyfði niður. Ég notaði lítin bursta til þess að hjálpa mér að dreyfa honum.


Then I took my Maybelline gel liner, again any gel liner will work. I dragged the inner and outer corner into a wing. I do drag it a lot longer after I took these picture.
Well that is all that it took to achieve this look just add mascara and maybe lashes if you want, I am very sure that you can also use a liquid liner to do this step.

> Síðan tók ég Maybelline gel linerinn minn, getið notað hvaða gel liner sem er. Ég gerði bara svona spíss með honum á innri augnkrókin og ytri. Ég reyndar geri ytri línuna lengri eftir að ég tók þessar myndir. 
Þetta er það eina sem ég gerði til þess að gera þetta look. Bara bæta við maskara og ef þið viljið gerviaugnhár. Ég er nokkuð viss um að þið getið líka notað blautan eyeliner í þetta skref!


These are all the product I used to get this look!

> Þetta eru allar vörurnar sem að ég notaði til að ná þessu looki :)


I decided to go with the new love of my life on my lips. Lime Crime Velvetine in Wicked. 
I am in looooooove!

> Ég ákvað að nota nýju ástina í lífi mínu. Lime Crime Velvetine í litnum Wicked.
Ég gjörsamlega eeeelska þennan lit!


Hope you guys enjoyed this blog post, until next!

Vona að ykkur hafi líkað þessi færsla! Þangað til næst.


xx


Halloween isn't really celebrated here in Iceland, although for the last year it has become sort of like a party thing. Lots of halloween parties are held so people tend to dress up.
I for one am not all for the scary stuff, it just freaks me out to much and I am not up for the sexy stuff either. I am more the pretty or funny costume halloween girl. 
I saw a picture of a deer makeup on Pinterest and thought it would be pretty easy to recreate, which it is. I looked at a lot of photos and a few videos before I just decided to wing it and do my own thing. I really like how it turned out and hope you do to! 
So if you like the photo above and want to know how to recreate it, keep on reading! 

> Eins og þið vitið þá er Halloween ekki jafn stórt hérna á Íslandi og það er í Bandaríkjunum. Samt eru alltaf einhver djömm í kringum Halloween, partý eða böll, þannig það eru sumir sem klæða sig uppí búning, enda er það alveg rosalega gaman!
Ég er ekki alveg týpan í að klína á mig blóði og vera ógeðsleg, hreinlega því ég er svo mikil skræfa og myndi bara verða hrædd við sjálfa mig! Ég er heldur ekki sú að nota þetta tækifæri í að klæða mig í eitthvað sexí. Ég er meira fyrir krúttlega og fyndna búninga.
Ég sá mynd af svona dádýra makeupi á Pinterest og hélt að þetta væri nokkuð einfalt til að gera, sem það er! Ég skoða margar myndir og nokkur myndbönd áður en ég ákvað að ég gæti bara gert þetta fríhendis og haft þetta svoldið svona mitt. 
Ég var mjög ánægð með lokútkomunina og vona að ykkur líki það líka!
Ef þið viljið vita hvernig hægt er að gera þetta þá bara lesið áfram :)


I start with just my normal foundation routine. Nothing fancy, just do what you usually do, to get a bit of coverage. 
I also did my hair in these two buns, and added a flower headband just to add a little more forresty animal thingy type haha.

> Ég byrjaði bara að gera venjulegu meik rútínuna mína. Ekkert flókið, gerið bara það sem þið gerið venjulega til að hylja það sem þarf að hylja ;)
Svo gerði ég hárið á mér í svona tvo úfna snúða og setti á mig blóma hárband til þess að fá smá svona skógar dýra vibe yfir þetta allt saman haha.


Next I took my Nyx Jumbo eye pencil in Milk. I put it under my eyes, in between and over my eyebrows and down my noise. I tried to make it as pigmented as I could in between and over the eyebrows and down my noise. I just blended it in with my fingers.
Very important step is to set this because it is such a creamy product it would just rub off if you don't. You can use translucent powder or just a white eyeshadow to do this.

> Síðan tók ég Nyx Jumbo eye pencil í litnum Milk. Ég notaði hann undir augun, á milli og yfir augabrúnirnar og niður nefið. Ég reyndi að hafa það mjög hvítt á milli og yfir augabrúnirnar og niður nefið. Ég blandaði þetta inn í húðina bara með puttunum.
Mjög mikilvægt er að setja annaðhvort gegnsætt púður eða hvítan augnskugga yfir þá staði sem maður notar þennan blýant. Hann er svo kremaður að annars nuddast hann bara af.


Then you can just take your bronzing powder or any eyeshadow. The important thing is that it is a warm toned brown and that it's matte. I used my Real Techniques buffing brush for this. 
I applied it to the apple of my cheeks and upwards. Then also on the sides and down the half of my forehead to meet the white. Also on my temples and down the sides of my neck.
I know this looks horrible like this.. just keep on reading! 

> Þá getiði bara tekið sólapúðrið ykkar eða þá augnskugga, aðal atriðið er að þeir séu hlýtóna brúnn litur og alveg mattur. Ég notaði Real Techniques buffing burstan minn og notaði hann til að setja litin á og það alveg vel af honum. Ég setti á kinnarnar og dreifði uppá við, á gagnaugað, hálft ennið, eins og þið sjáist þá mætir hann hvíta litnum á enninu og svo setti ég hann líka niður hliðarnar á hálsinum.
Ég veit að þetta lítur hræðilega út haldið bara áfram niður haha!


Here I just did my eyebrows as usual just with a really dark brown shadow. When I've done the eyebrows I went to the top of the front and dragged, with the same colour down all the way down to the noise. I used my eyebrow brush to do this. Then I took just a normal eyeshadow blending brush and the same dark brown and blended the line out toward the eyes. (This was a little hard to explain, I hope when you look at the pictures you know what I mean!)
I had to do this a couple of times and just packed the colour on because I want it to be very very dark.

> Hérna gerði ég bara augabrúnirnar mínar eins og venjulega nema bara með mjög dökkum augnskugga. Þegar ég var búin að gera þær þá fór ég efst á byrjuninna á augabrúnum og dró línu alla leiðina niður að nefinu, til þess að gera þetta þá nota ég bara skáskorna augabruna burstann minn. Síðan tók ég venjulegan augnskuggabursta og sama dökk brúna litin og blandaði línuna í átt að augunum. (Það er mjög erfitt að útskýra þetta en ég vona þegar þið horfið á myndarnar þá fattiði hvað ég meina!)
Ég þurfti að blanda alveg nokkrum sinnum til þess að fá litinn jafn dökkan og ég vildi.


Now time for eyeshadow! I just to the same warm toned bronzing powder and placed it in my crease and I pulled it out in like a wing type thing. On the lid I just put white eyeshadows all over. For a little bit of dimension I took the same dark brown I used in my eyebrows and with a vera light hand placed it in the outer corner of the crease.

> Þá er komið að augnskugganum. Ég tók bara sama hlýtóna sólapúðrið og ég notaði á húðina og setti það á glóbuslínuna og dró hana svoldið langt út og upp á við. 
Á augnlokið sjálft setti ég bara mattan hvítan lit.
Til þess að fá aðeins meiri dýpt í augað þá tók ég sama dökka lit og ég notaði í augabrúnirnar og setti hann á ytri helming glóbus línunar.


Then I took my Maybelline gel liner and did the line as you see here. I have no idea how to explain this. To make it much more animalistic I dragged the line outwards like I did with the shadow. And dragged it really down in the inner corners. 
I then took the same Nyx pencil as before, just on a really small brush and placed on top of the black in the outer corner.

> Síðan tók ég Maybelline gel linerinn minn og gerði línurnar sem þið sjáið hérna fyrir ofan.
Þetta er frekar erfitt til að útskýra. Mér fannst ég gera lookið meira dýrslegra ef ég dró línuna svona langt út eins og ég gerði með augnskuggan. Einnig að draga hana svona langt niður í augnkróknum.
Ég tók svo smá af Nyx blýantinum, sem við notuðum á andlitið, á lítin bursta og gerði hvíta línu fyrir ofan svörtu línuna á ytri helmingnum.


For the finishing touches on the eyes I added Socialeyes in Flirt which I got from Haustfjord.is. I also added the same white Nyx pencil on my waterline and dragged it really down as you can see. To add some depth into it I took the same bronzing powder and slightly made lines under the white.
Then the eyes are complete!

> Til þess að ljúka af augunum þá notaði ég gerviaugnhár frá Socialeyes í Flirt (elska þessi!) ég keypti mín frá Haustfjord.is. Ég tók líka sama hvíta Nyx blýant og setti á vatnslínuna mína og dró hvíta lítin mjög neðarlega eins og þið sjáið til þess að reyna að búa til stærri augu. 
Til þess að bæta smá dýpt í það þá tók ég sama sólapúður og ég er búin að vera nota á bursta og setti mjög lítið í einu undir hvíta litinn.


Then to bring the whole look together I used the same gel liner to line the noise and upper lip. Also in an attempt to hide my lower lip I put foundation over it. 
Then just with the Jumbo eye pencil from Nyx in Milk I did the spots. You could use a brush to make the spots in different sizes if you want.

> Til þess að klára af heila lookið þá notaði ég sama gel linerinn til að gera nefið og efri vörinna. Til þess að reyna að fela neðri þá setti ég meik yfir hana. 
Síðan bara með Jumbó blýantinum frá Nyx í Milk þá gerði ég doppurnar, ef þið viljið mismunandi stærðir af doppum þá getið þið bara notað bursa með litnum á :)


Hope you liked this tutorial, until next time!

> Vona að ykkur hafi líkað við þessa færslu, þangað til næst!


xx


This time of year, when it gets colder, my skin goes from normal, slightly dry to dry, dry and more dry. It cracks, it gets even more sensitive, sometimes I feel like I can't smile because I thought the skin around my mouth would just crack open. I just kept using my Body Shop Vitamin E intense moisture cream all over my face that I blogged about here but it wasn't doing the trick.

Á hverju ári á þessum tíma þegar að það byrjar að kólna svona mikið þá breytist húðin mín úr venjuleg, svoldið þurr í að vera þurr, þurr og extra þurr. Mér líður stundum eins og ef ég brosi þá mun húðin bara brotna í kringum munninn. Ég var bara að nota Body Shop Vitamin E intense moisture cream sem ég bloggaði um hér yfir allt andlitið en það var ekki að virka.


Then when I was with my sister at my local pharmacy the other day this product caught my eye. I've never understood toner, well I don't understand toner and I've never used one. However I thought this one looked like it could maybe help my problem, since it's targeted for Dry and sensitive skin.
I can NOT stress enough how well this product worked for me. All my dry spots went away! my skin feels so smooth and soft which is so weird for me in October. I will never ever stop using this!
I use this on a cotton after I cleanse my face and before I put on cream, or sometimes oils at night. I use it twice a day. Don't know if thats the right way but man it works wonders. 


> Þegar ég var með systur minni í apótekinu hérna nálægt þá sá ég þessa vöru sem er hérna fyrir ofan. Ég hugsaði hmm kannski getur þetta hjálpa mér eitthvað þar sem að það stendur á henni að hún sé fyrir þurra og viðkvæma húð. Ég hef aldrei fattað til hvers Toner er og aldrei notað svoleiðis en ég ákvað að þessi vara gæti ekki skaðaða og keypti hana.
Guð minn góðuuuur hvað hún er góð! Þurrkublettirnir hurfu og húðin var öll mjúk sem er mjög skrítið fyrir mig, sérstaklega í október! Ég mun aldrei hætta að nota hana.
Ég set tónerinn á bómul og strýk yfir allt andlitið, þegar að ég er búin að nota hreinsi og áður en að ég set á mig krem, eða olíu sem ég nota stundum fyrir næturnar. Ég nota þetta á morgnanna og kvöldin, veit ekkert hvort að það á að gera það tvisvar en það virkar fyrir mig.

I would like to say thank you to all of you 200 that liked my Facebook page, I find that so amazing  

> Ég ætla að enda þessa færslu að segja takk við ykkur 200 sem að líkuðu við Facebook síðuna mína, það er bara svo æðislegt! 

xx


I really like this makeup look! Although I did forgot to put on lipstick.. don't hate me! I think a nude lip would look good with this but if you want to go bold a dark lip is always good too!
All I used on the eyes are these three Nyx eyeshadows, Golden - Rust - Walnut Bronze. I think that the Rust colour is just gorgeous and I thought these colours were perfect for like a fall type sunset inspired makeup tutorial and I hope you like it too!

> Ég er mjög ánægð með þessa förðun! Ég gleymdi samt að setja á mig varalit, sorry! Ég held að svona nude varalitur passi vel við eða ef þið erum mjög djörf þá er dökkur varalitur alltaf flottur!
Eina sem ég notaði á augun er þetta tríó frá Nyx. Litirnir eru Golden - Rust - Walnut Bronze. Mér finnst Rust likur svo fallegur og hélt að þessir litir væru fullkomnir í svona haustlegt sólaseturs inspired förðun. Vona að ykkur finnst þetta flott.


I took the golden colour in my crease and kind of above it also. Because I wanted the colours to blend out to the golden colour. 

> Ég setti gullitaða litin í glóbus línuna og svoldið fyrir ofan hana líka. Vegna þess að ég vildi að litirnir blandaðist útí gullitaða litin.


Then I put the Rust colour on the eye lid but only the outer half and then blended it to the golden colour. 

> Svo setti ég Rust litinn á augnlokið, samt bara ytri helmingin og blandaða hann uppí gullitaða litin.


With the brown shade I put it on the parts that have no shadow and blended it out in the others, I then kept putting more Rust and Golden on until I was satisfied with the colours. I do clean up the ends so bear with me!

> Með brúna litinn þá setti ég hann á staðinn sem var ekki með neinn augnskugga á og blandaði hannút í hina. Svo hélt ég bara áfram að setja Rust og Golden á þangað til að ég var ánægð með allt, svo er lykillin að blanda blanda blanda! Ég mun laga í kringum augnskuggana.


Then I just finished the rest of my fave and added Walnut Bronze and Rust mixed together under the eyes and blended! 
Hope you enjoyed this tutorial! 

> Svo kláraði ég að mála mig og setti Walnut Bronze og Rust blandað saman undir augun og þá var ég búin!
Vona að ykkur hafi líka þessi færsla! 


xx


Powered by Blogger.